

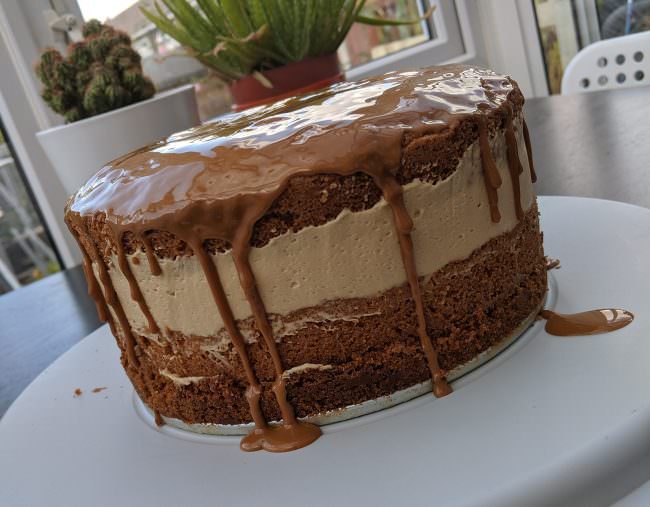
Every year, Gaz and I attend a BBQ with a group of friends from the Internet and consume vast quantities of delicious foods. My contribution to this BBQ is always a cake or cheesecake of some variety (as well as my sparkling personality) but this year I couldn’t decide which to make. I knew I wanted to take a Lotus Biscoff Spread themed item, but as I have successfully created both cheesecake and sponge cake varieties on the theme, I wasn’t sure which to repeat. To combat my inevitable choice anxiety I made the only logical decision: a hybrid/combo cake. A buttery biscuit base, like all good cheesecakes, followed by a sponge layer, cheesecake layer, second sponge layer and finally a biscoff drizzle.
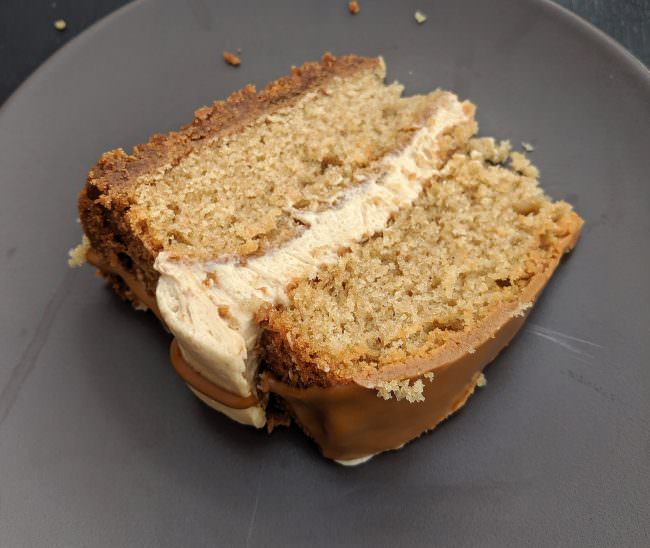
The Biscoff Cheesecakecake would need to feature all of the best bits from both the cake and cheesecake, but I didn’t want the cheesecake to overwhelm the sponge; cheesecakes can sometimes be heavy and rich enough on their own without all the extra cake-y bits thrown in. In an attempt to bring together the best of both, I leaned towards a more mousse-like filling for the cake. Still reliant on soft cheese but not so much that it would be overpowering, with whipped cream to give it lightness in both flavour and volume. The cheesecakecake was born, and was hailed a massive success by all who tasted it, so much so that Gaz asked for a reproduction for his birthday yesterday. Here’s what I ended up with…
Equipment
You’ll need three 9″ pans for this bake. Two pans to make the actual sponge, and a taller pan with a removable base to assemble the cake and hold it together while it chills to set the cheesecake filling. I use the 9″ pan from this tiered set on Amazon* for my bake. Line the two sponge pans with greaseproof / baking paper for ease of removal.
You’ll need a heavy mixing bowl and wooden spoon, or food mixer to make the sponge. I wash and re-use the same bits to make the cheesecake style filling, but you’ll need also mixing bowl and whisk (electric or manual) to whip the cream.
You’ll need a large-ish saucepan for the base.
Ingredients
For the base
This makes quite a thick base. You could reduce this (keep the ratio approx 2x biscuits to butter), or leave it off altogether for a less cheesecake-y vibe.
- 200g Lotus Biscoff biscuits
- 100g butter
For the sponges
- 200g butter
- 250g self-raising flour
- 1 level teaspoon baking powder
- 200g golden caster sugar (regular white caster sugar is also fine)
- 2 heaped tablespoons Biscoff spread
- 4 large eggs
- 1 level teaspoon ground cinnamon
For the cheesecake-style filling
- 200g soft cheese (e.g. Philadelphia, although own brand stuff is fine)
- 1 heaped tablespoon Biscoff spread
- 50g icing sugar
- 150ml double (whipping) cream
For the drizzle
- 1-2 tablespoons Biscoff spread (or whatever’s left in the jar)
You’ll also want more Biscoff for between the layers. I use an entire 400g jar in this creation (although inevitably eat some of that out of the jar).
Recipe Method Thingymabob
Preheat your oven to 160 degrees C (320 F) or approx 140 C (284 F) if it’s a fan assisted oven.
The base
Melt the butter over a gentle heat in a large saucepan (bigger than you think you’ll need, as you’ll be adding the biscuits shortly). Meanwhile, smash the lotus biscuits to a crumb. I use a plastic food bag and a rolling pin to achieve this – it’s quite therapeutic.
When your butter is melted, add the biscuit crumbs to the butter and combine well.
Press the biscuit crumb mix down into your tall 9″ pan and bake in the oven for 7-8 minutes. When complete, refrigerate to cool fully. Keep your oven at the same temperature for the sponges.
The sponges
In your heavy bowl, or with a food mixer, beat together the butter and sugar until fully creamed/combined. Add the 2 heaped tablespoons of Biscoff spread and teaspoon of ground cinnamon and combine well.
In a separate bowl or jug, whisk together the eggs, then add them to the butter mix a dollop at a time, gently mixing in.
When all the eggs have been added, sieve in your self-raising flour and teaspoon of baking powder (I add the extra raising agent because I buy cheap flour – if you get a good self-raising flour you probably won’t need the baking powder). Gently fold in the flour until just combined. Overworking the flour at this point will give you a heavier, denser sponge so try not to get over-excited.
Divide the sponge mix equally between your two sponge pans and bake for approx 25 minutes. Test by inserting a skewer (or a piece of dry spaghetti) into the centre of the sponge: if it comes out clean, it’s ready. (You can turn off your oven now.)
Leave to cool in the pans for about 15 minutes then remove the sponges from the pans and cool completely on a wire rack.
The cheesecake-y filling
When the sponges are completely cool, we can start on the filling. Beat together the 200g soft cheese and heaped tablespoon of Biscoff spread. Sieve in the icing sugar and leave to one side.
Whisk the double cream until semi-stiff peaks are formed. Add the whipped cream to the Biscoff and cheese mix, a little at a time, combining carefully so as not to lose too much air from the cream. Time to assemble!
Assembly
Spread a thin layer of Biscoff spread over your biscuit base already set in your tall pan. I find it easiest to do this with the back of a tablespoon.
Add your first sponge layer, then apply another thin layer of Biscoff spread to the top of the sponge.
Add all of your cheesecake mousse mix to that, then carefully add the second sponge layer. Refrigerate for approximately 1 hour to allow the cheesecake filling to set.
When you’re ready to serve, carefully remove the cheesecakecake from the tin by running a butter knife around the outside edge to loosen any bits stuck to the pan and pushing up from the middle.
In the microwave, blast the last of your Biscoff spread for about 5-10 seconds to make it all oozy and dribbly. When just melted, pour on top of the cake in the middle and allow gravity to do the work to create your lovely drizzle effect. If you’ve not used enough Biscoff, or the melt is slightly under-done, you can aid the drizzle with the back of tablespoon, pushing it to the edges.
And tada! One delightfully delicious Biscoff Cheesecakecake. (Photography isn’t my strong point, but food is: trust me when I say it’s delicious.)
* Marked links are external affiliate links.
09 Sep at 2:38 pm
YES! I saw photos of this and was wondering if you had a recipe… :)
09 Mar at 1:57 pm
I stumbled upon this recipe whilst searching for cheesecake recipes. What a genius idea – biscoff cheesecake! I’ll definitely be trying out this recipe. Thank you for sharing xxx